
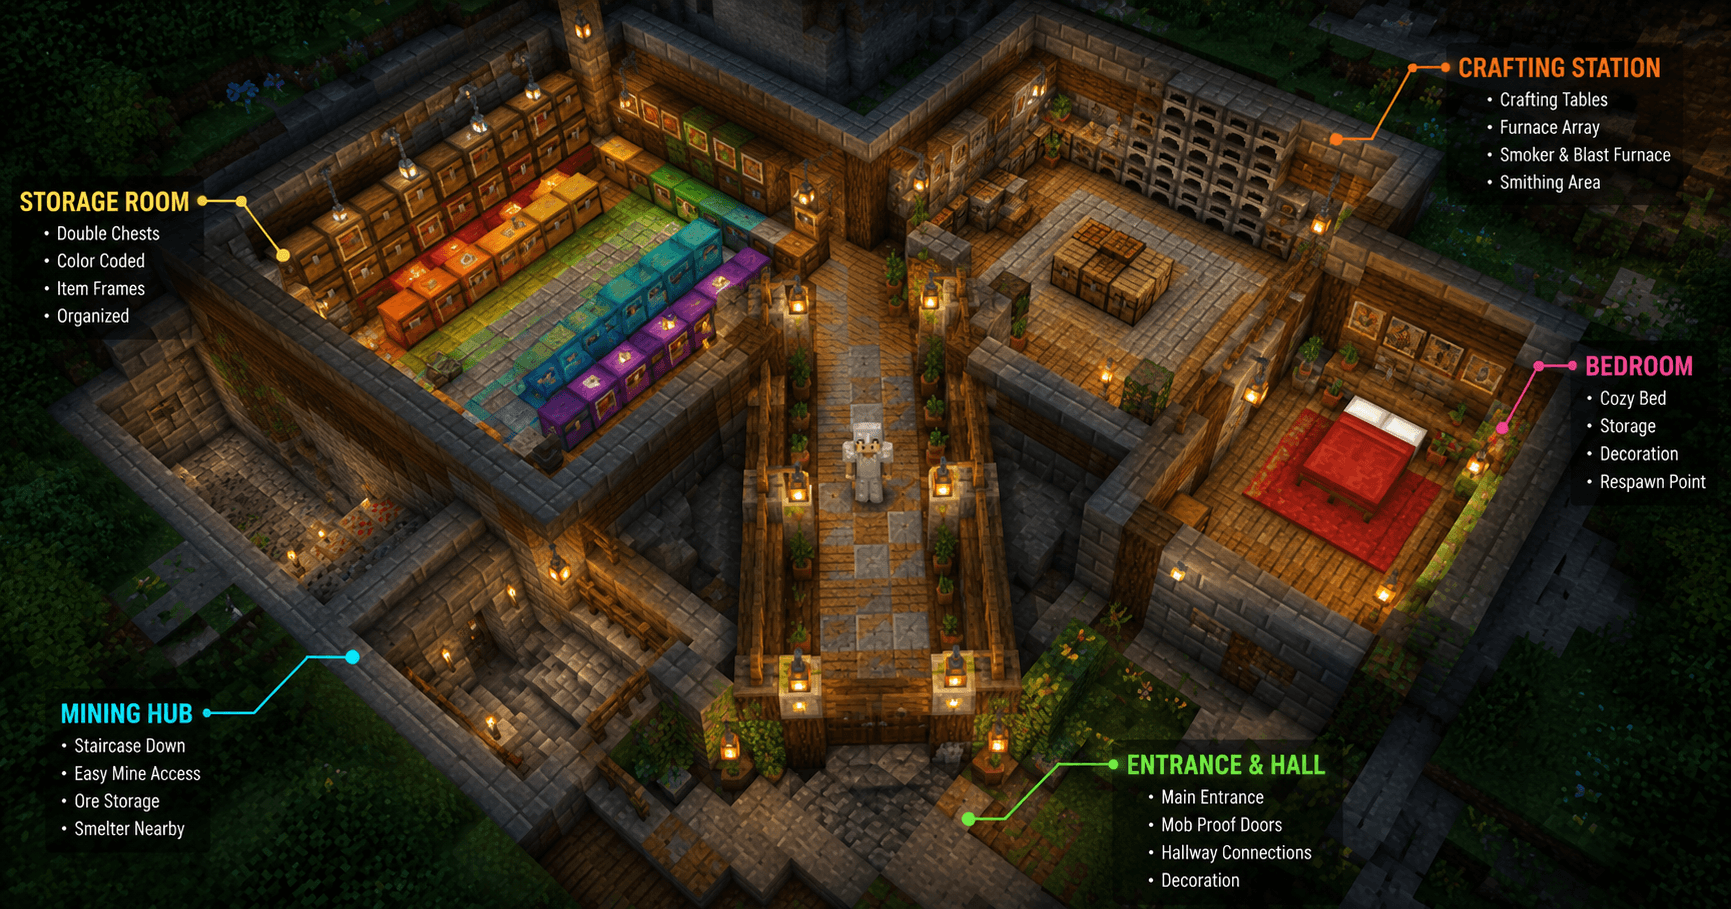

Every player builds a starter base. Most end up as eyesores—random shacks with chests scattered everywhere, no storage system, no thought to layout. By day ten of playing, they're looking at their home wondering why it feels chaotic.
The difference between a terrible starter base and a great one isn't complexity. It's planning. A starter base that actually works has clear zones: storage here, crafting there, mining operations over there. Everything has a purpose.
And it can still look good. You don't need a million blocks or a crazy aesthetic. You just need intention.
Starter Base Design Philosophy
The golden rule: function first, beauty second.
A pretty base that doesn't work wastes time. An ugly base that works is fine. You'll improve it later. An ugly base that doesn't work is the problem.
So everything that follows prioritizes getting a system in place quickly. Once the system works, you add aesthetics.
Space requirements:
- Minimum footprint: 16x16 blocks (256 sq blocks). Doable but cramped.
- Comfortable footprint: 20x20 or 24x24 blocks. Room to organize without feeling squeezed.
- Scalable footprint: 30x30 or larger. Leaves room to expand without tearing everything down.
Pick size based on how many players will use the base.
The Minimum Viable Base
If you want just a place to sleep and craft, you need three zones:
Zone 1: Entrance
- Door (single block, any door type)
- Space to remove armor
Zone 2: Crafting/Smelting
- Crafting table (for 3x3 recipes)
- Furnace (or blast furnace if you have it)
- Bed (for sleeping through night)
- Chests (temporary item holding)
Zone 3: Storage
- Double chests or larger
- Organized by resource type
That's it. 12x12 blocks covers all three zones. Not fancy, but functional.
Most players need more than this by day three.
The Practical Starter Base (What You Actually Need)
Here's the setup that carries through midgame:
Entrance area (4x8 blocks):
- Main door
- Item drop-off (small chest for items to be sorted)
- Armor storage (chest for armor pieces, tools)
- Furnace for initial smelting
Crafting/Utility zone (6x8 blocks):
- Crafting table
- Furnace (backup or dedicated)
- Enchanting table (optional, place later)
- Anvil (for tool repair, also optional)
- Barrel (single-item storage, useful for specific resources)
Main storage room (10x10 blocks minimum, can expand):
- Double chests, organized by type
- Layout: wood here, stone there, metals corner 1, building blocks corner 2, food section, tools section
- Hotbar-accessible items at eye level
- Rare items in a dedicated locked chest (if multiplayer)
Mining hub (separate room, 8x8 or larger):
- Mine entrance directly below
- Staircase down (or ladder)
- Storage for mining loot (temporary holding before processing)
- Tool repair station (anvil or grindstone)
Bedroom (simple, 4x6 blocks):
- Bed
- Torches
- Optional: decoration or plants
Living space (8x8 blocks for common area):
- Light source (lanterns)
- Decorative elements
- Dining area (optional, just for aesthetics)
Total footprint: About 30x30 blocks. Fits everything without cramping.
Storage Organization System
This is where most bases fail. Random chests everywhere, players forgetting where items are, duplicated storage.
Use this system:
Organize by type, not by area:
- Woods (oak, birch, spruce, dark oak separate)
- Stones (stone, cobble, smooth stone, blackstone, etc.)
- Ores (iron, coal, lapis, gold, diamond, etc.)
- Metals (iron ingots, gold ingots, netherite pieces)
- Redstone (dust, comparators, repeaters, observers)
- Building blocks (quartz, bricks, prismarine, etc.)
- Food (wheat, meat, fish, bread)
- Tools (pickaxes, shovels, swords, armor)
- Enchanted items (Mending books, unused enchanted gear)
Each category gets its own chest or barrel. Single-item types get barrels. Multi-item types get double chests.
Placement strategy:
- Most-used items at eye level in accessible chests
- Raw materials on the back wall (less frequent access)
- Precious items (diamonds, Mending books) in a separate secure area
- Overflow storage in a secondary room (for when you farm heavily)
Pro tip: Place hoppers above chests for automatic sorting if you set up a sorting system later. Plan for it now, implement it later.
Mining Hub Design
Where you actually spend half your time.
Basic setup:
- Entrance to the mine
- Staircase down (spiral is efficient, straight ladder is fast)
- Storage room for ore and other loot
- Tool repair station
Staircase design:
- 2x2 spiral: fast descent, easy navigation
- Straight descent with ladder: slower but clear vertical sight line
- Horizontal tunnels: best for branch mining
Mining strategy:
- Pick one direction and branch out at intervals
- Leave torches on right side as you go (easier to navigate back)
- Collect all ore, sort at base later
Loot storage:
- Temporary chests near the exit
- Sort into final storage once you surface
- Saves inventory space for continued mining
The Expansion Trap (How to Avoid It)
Most players build a base, outgrow it in two weeks, and decide to rebuild. This is wasteful.
Design for future growth now.
Leave space on three sides. If your main base is 30x30, leave a 15-block buffer on all sides. Future builds (farms, sorting systems, mob grinders) go there, not on top of your home.
Connect everything with a hallway. As your base grows, paths matter. A central hallway system (3-block high, 2-block wide) connects all zones. New builds attach to this hallway.
Plan vertical expansion. Before you know it, you'll want a second floor. Second floors hold offices, workshops, guest rooms. Plan for a 5-block-tall interior minimum (so you can add a second floor later).
Never make storage permanent. Storage should be modular. If you run out of chest space, add another room. Don't rebuild your entire base for more storage.
Aesthetics (Without Extra Work)
Ugly bases look ugly because of materials and symmetry, not size.
Use two main materials. Pick a primary material (oak planks?) and a secondary material (oak logs or dark oak planks). Every wall alternates. Already looks intentional.
Vary block heights. A flat roof is boring. Vary rooflines, add small towers, slopes, overhangs. Costs almost no extra material; changes everything.
Add lighting intentionally. Don't spam torches everywhere. Use lanterns at regular intervals. Torches as accents, not coverage.
Single front door. A base with multiple entrances looks messy. One main door (fancy if you want), service exits to mining hub or farm areas.
Frame windows. A window is a single hole. A framed window (dark wood or blackstone frame around glass) looks intentional.
Avoid mixing too many wood types. One wood type (or complementary pair) looks cohesive. Three wood types in one wall looks random.
Before vs After: Real Transformation
Most starters build ugly bases, then improve them over weeks. Here's what that looks like:
Day 1-3 (The Shack):
- Dirt/wood box
- Single furnace
- Chests everywhere
- No organization
- Looks desperate
Day 4-7 (Adding structure):
- Dedicated rooms start appearing
- Organized storage zones
- Basic entrance
- Starts looking intentional
Day 8-15 (The Good Base):
- Full storage system
- Mining hub connected
- Crafting station
- Looks like a real home
Week 3+ (Expansion):
- Farms attached
- Secondary builds connected via hallway
- Enchanting room added
- Looks like a full compound
This progression happens naturally if you plan for it.
Single-Player vs Multiplayer Bases
Single-player bases can be compact and personal. Multiplayer bases need more space and communal zones.
Single-player (20x20 minimum):
- Private bedroom
- Personal storage
- Solo crafting area
Multiplayer (40x40 minimum):
- Communal spawn area
- Shared storage (color-coded by owner)
- Multiple bedrooms
- Large crafting stations
- Shared mining hub
- Common area for gathering
Multiplayer bases take 2-3x longer but create community.
FAQ
Q: Should I build above or below? A: Below is better. Caves are already there; use them. Above means building tall and exposed.
Q: How many furnaces do I need? A: One starting out. Three by midgame (regular furnace, blast furnace, smoker for different speeds). More if you're farming heavily.
Q: Should I spend time decorating on day one? A: No. Get functional first. Decorations come later.
Q: What if I run out of space? A: Plan for expansion when you build. Leave buffers. Add wings, not replacement builds.
Q: Can I use any texture pack with a starter base? A: Yes. The design principles work with any aesthetic.
Final Thoughts
A great starter base isn't complex. It's organized. It has clear zones, easy access to everything, and room to grow.
Build function first. Beauty follows naturally. By week two, your base will be unrecognizable compared to day one, but the foundation you built stays solid.
That's the real accomplishment: a base that works from day one and improves over time instead of getting torn down and rebuilt.
Most bases don't survive that test. Yours will.